Hello . Got questions? scroll down to uncover all the secrets (aka FAQs)!
Log in here: My Courses
This will take you to a summary of the course(s) you’re enrolled in, including links to any certificates. Click on the name of the course to access the course materials. Most courses consist of multiple lessons, which usually need to be completed in order. You won’t be able to progress to the next section until each lesson is marked as complete.
Enter the email address associated with your account and click Submit. Then, check your inbox for an email from Mission Accomplished containing a link to reset your password. If you don’t see the email, check your spam or junk folder.
Click the password reset link in the email, and you’ll be taken to a secure page to create a new password. Enter your new password, confirm it, and click Reset Password.
Finally, return to the login page and log in using your new password.
Adding a User to a Group
Adding a Single User
When you click the Users button, you’ll see options to add either one user or multiple users. Let’s start with adding a single user.
If you select Add One, a form appears with two main options:
Add and Invite User
- Enter the user’s first name, last name, and email address.
- Once you click the Add User button:
- The system sends the user an email.
- The user is added to the group, occupies a place in the group, and their status is set to Not Started.
- If the user already exists on the site, the system will automatically add them to the group and send them an email. They will occupy a seat in the group as if they were a new user.
Send Enrolment Key
- Enter the user’s first name, last name, and email address.
- The system sends them an email with an enrolment key.
- The user must register on the site and redeem the enrolment key to join the group. Once they redeem the key, they occupy a seat in the group and are enrolled in the group courses.
Recommendation:
We recommend using the Add and Invite User option. It is simpler and more user-friendly because it:
- Automatically sets up an account for the user if they don’t already have one.
- Sends an email to confirm their details, set a password, and enrol them in the group.
The Send Enrolment Key option is less efficient, as the user must handle keys and registration themselves, making it more complicated.
Adding Multiple Users
To add multiple users, you have two options:
Add Multiple
- Click Users > Add Multiple, and you’ll be presented with a form similar to the one for adding a single user.
- Fill out the details for multiple users at once.
Upload Users (CSV)
The fastest and simplest way to onboard many users is by uploading a CSV file.
- To do this, click Users > Upload Users and download the provided CSV template. The template contains four columns:
- user_email: The email address of the user.
- user_pass: The user’s password. Leave this blank to allow the system to generate a random password for new users while keeping existing users’ passwords unchanged.
- first_name: The user’s first name.
- last_name: The user’s last name.
- Once you’ve filled out the template, upload it to the system. You can choose whether or not to send an email to the users being uploaded. For example, you may opt not to send an email if you plan to distribute enrolment keys manually.
Note:
Using the CSV upload method is ideal for onboarding large groups, as it’s quick, efficient, and customisable to your needs.
If you have any additional questions or need assistance with user onboarding, feel free to reach out to us!
- Clear your browser history and cookies, and double-check that the application link is correct.
- Ensure you are not using public Wi-Fi and verify that you are accessing our website from within the UK.
- If the issue persists, try using another web browser (e.g., Chrome, Firefox, or Edge).
If you continue to experience technical difficulties, such as the form not loading or submitting correctly, please contact us at training@mission.guru for further assistance.
How do I open the accessibility menu?
Look for the circular icon with a person inside (usually at the corner of the screen). Click on this icon to open the menu.
Do I need to download anything to use the menu?
No, the accessibility menu is built directly into the website. Just click the icon to start using it.
What features are available in the accessibility menu?
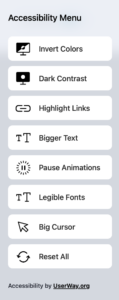
- Invert Colors: Switch the website’s colors for better visibility.
- Dark Contrast: Enhance text and background contrast for easier reading.
- Highlight Links: Make all clickable links stand out for better navigation.
- Bigger Text: Increase text size for improved readability.
- Pause Animations: Stop moving elements for a distraction-free experience.
- Legible Fonts: Use simple, easy-to-read fonts.
- Big Cursor: Make the mouse pointer larger and easier to see.
- Reset All: Revert all settings back to the default view.
